PillMinder is available for download through the Apple iTunes Store.

Pillminder allows you to track:
- All the pills you’re taking, along with dosage instructions.
- What each pill looks like (in case you tend to confuse your pills), including both a detailed description and one or more images of the pill taken with the iPhone camera.
- When you’ve taken each pill, including a history.
- How many pills of each type you have on hand.
- How many days at the recommended dosage until you run out of each pilll.
Main Screen

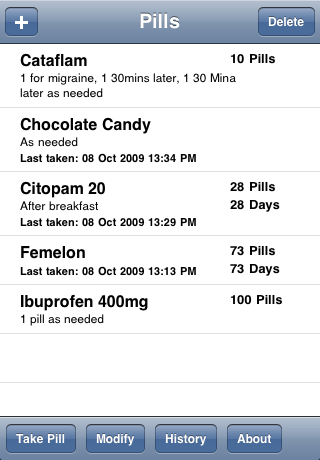
From PillMinder‘s main page, you can:
- Add a pill to the pill list (+ at the upper left)
- Delete a pill from the pill list (Delete)
- Record that you’ve taken a pill (Take Pill)
- Go to the modify screen to modify a pill’s details (Modify)
- Go to the History screen to view and modify the history for that pill (History)
- Go to the About screen to view information about this application and how to use it (About)
Add & Modify Pill

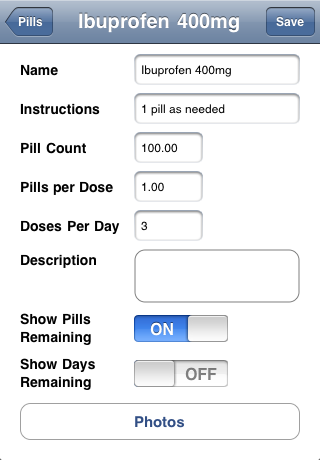
The screen for adding a pill and editing an existing pill is the same. You can record or change:
- The name of the pill (displayed on main screen).
- Usage instructions (displayed on main screen).
- Pill count (optionally displayed on main screen).
- Pills per dose (including portions of a pill such as 1/2 or 1/4 – to be entered as 0.5 or 0.25).
- Number of doses per day.
- A detailed description of each pill so that you can recognize the pill later, especially if you have a lot of different pills.
You can also elect to have the number of pills remaining and number of days remaining displayed on the main screen.
Additionally, you can use the “Photos” button to go to the photos scren to either add one or more photos of your pill, or browse the photos you’ve already added.
When you refill your prescription, simply edit the pill and add the number of pills you received to the number still in inventory.
When you’re done, tap on Save to save your changes or additions and return to the main screen. If you want to return to the main screen without saving any changes or additions, tap on the Pills button.
Photos

The photos screen lists the thumbnails for all the photos/images you’ve already added for the pill that you’re currently editing. If you’ve not added any photos, then the list will, of course, be empty.
If you select one of the existing images from the list, you’ll be taken to a fullscreen image view where you can see the image of the pill in more detail.
Add Photo

Clicking on the “Add Photo” button brings up the iPhone camera view which allows you to take (and edit) images using the built-in camera on the iPhone. First, click the camera button to take the image, and then edit the image on screen. Once you are happy with the image, simply click the “Use” button to save the image.
History
You can view the history of pills you’ve taken, including date and time the pills were taken. Made a mistake in recording the date and time a pill was taken? Tap on that line and you can edit the information. Recorded a pill taken by mistake? Tap the delete button and tap on the – sign beside the incorrect entry. Or swipe an entry to either the left or right and confirm the deletion by tapping the delete button.

This is the screen for editing the date and time a pill was taken.
In-App Upgrade
Pillminder, when initially installed, allows you to track 1 pill. When you try to add a second pill, you’re prompted to upgrade the iPhone application as seen in the following image.


Once you’ve purchased the upgrade, the purchase is recorded on your account and you won’t have to purchase it again. If, however, your personal information is wiped from your phone, then the app will say you need to upgrade, but you will not be charged since the purchase was recorded at the Apple server end as well. You simply need to go through the process again to re-upgrade the app.
Support for PillMinder
If you have any questions about PillMinder, experience any problems, or have any comments or suggestions, please feel free to visit our support forums.


